
<h1 align="center">
 <br/>
PaperRipple
</h1>
<br/>
PaperRipple
</h1>


![]()
Material Design Ripple effect in pure JS & CSS.
PaperRipple lets you add a Material Design ripple effect to UI elements.
Install
Bower:
$ bower install paper-ripple
NPM:
$ npm install paper-ripple --save
How it looks like
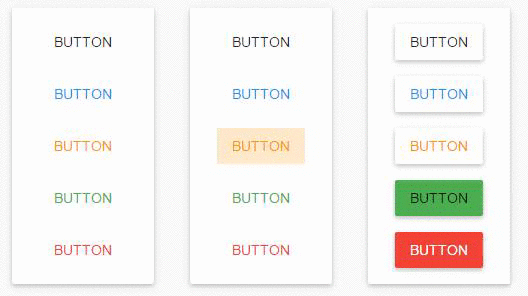
Live example at codepen.
Usage
First, you need to include PaperRipple JS and CSS files to your HTML-page.
Assume, you have next HTML:
<button class="paper-button">button</button>
<button class="paper-button blue-text">button</button>
<button class="paper-button orange-text">button</button>
Your JS will look like:
// // Getting all the buttons
var button = document.querySelectorAll('button.paper-button');

// Traversing the buttons
[].forEach.call(buttons, function(button) {
    // New PaperRipple for the button
    var ripple = new PaperRipple();

    // Adding ripple container to the button
    button.appendChild(ripple.$);

    // Subscribing to 'mousedown' and 'mouseup' button events to activate ripple effect
    // when a user clicks on the button.
    button.addEventListener('mousedown', function(ev) {
        ripple.downAction(ev);
    });
    button.addEventListener('mouseup', function() {
        ripple.upAction();
    });
});
NOTE: It's important that each element you add the ripple to must be relative position.
If you prefer to work with modules in JS, PaperRipple exports itself in AMD, CommonJS and as global variable if no require or module were found. In addition, under dist\systemjs you may find PaperRipple as SystemJS module.
Even more, if you prefer to work with jQuery you may find jQuery plugin based on PaperRipple under dist folder. So, the previous example may be simplified to the next:
$('button.paper-button').paperRipple();
Configuration
You may pass additional options to the constructor to control PaperRipple behavior:
var ripple = new PaperRipple(cfg);
If you have DOM element you want to use as PaparRipple element, pass it to the constructor. But be careful, PaperRipple element must follow next structure:
<div class="paper-ripple">
    <!-- optional -->
    <div class="paper-ripple__background"></div>

    <!-- optional -->
    <div class="paper-ripple__waves"></div>
</div>
var rippleEl = document.querySelector('.paper-ripple'),
    ripple = new PaperRipple(rippleEl);

assert(ripple.$ === rippleEl); // true
Or you may pass object containing next options:
initialOpacity: Number - Defaults to0.25. The initial opacity of the each wave.opacityDecayVelocity: Number - Defaults to0.8. How fast (opacity per second) the wave fades out.recenters: Boolean - Defaults tofalse. Iftrue, waves will exhibit a gravitational pull towards the center of their container as they fade away.center: Boolean - Defaults tofalse. Iftrue, waves will center inside its container.target: HTMLElement - Defaults tonull. Target DOM element as the container for the waves.
var ripple = new PaperRipple({
    initialOpacity: 0.3,
    recenters: true
});
Each of these options may be changed after initializing:
ripple.center = true;
ripple.opacityDecayVelocity = 0.7;
NOTE: Changing of $, $background or $waves after initialization not recommended.
Styling
Use CSS color property to style the ripple:
.paper-ripple {
    color: #FF9800;
}
NOTE: CSS color property is inherited so it is not required to set it on the .paper-ripple directly.
If you want to make the rippling effect within a circle, add .paper-ripple--round to main DOM element:
var ripple = new PaperRipple();

ripple.$.classList.add('paper-ripple--round').
Browser Support
- Chrome
- Firefox
- Safari
- Opera
- IE9+
NOTE: IE9 doesn't support classList on HTMLElement object and requestAnimationFrame. You need to polyfill it. My choice: classList - bower install classlist or npm install classlist-polyfill; requestAnimationFrame - bower install window.requestanimationframe or npm install window.requestanimationframe.
Docs
PaperRipple JS has an excellent documentation. Esdoc is used to generate it. To generate it by yourself do following:
Clone the repo:
$ git clone https://github.com/virtyaluk/paper-ripple.git
Install dependencies:
$ npm install -g gulp && npm install
Generate the docs:
$ gulp docs
Docs will be available under docs folder in the root of the project.
Running tests
Install dependencies:
$ npm install
Run them:
$ gulp test
License
MIT © Bohdan Shtepan